DIY Ping Pong Table: How to Build a Regulation Table at Home (2026)
 By Harshwardhan · Updated
In This Article
- Can You Build Your Own Ping Pong Table?
- What the Rules Say a Table Must Be
- Materials and Tools List
- Choosing the Board: Plywood vs MDF
- How to Build a DIY Ping Pong Table, Step by Step
- Supports: Frame, Sawhorses or an Existing Table
- Painting a Ping Pong Table
- Net Options for a Homemade Table
- Building an Outdoor DIY Ping Pong Table
- Time, Difficulty and Cost
- Safety Tips
- Frequently Asked Questions
Can You Build Your Own Ping Pong Table?
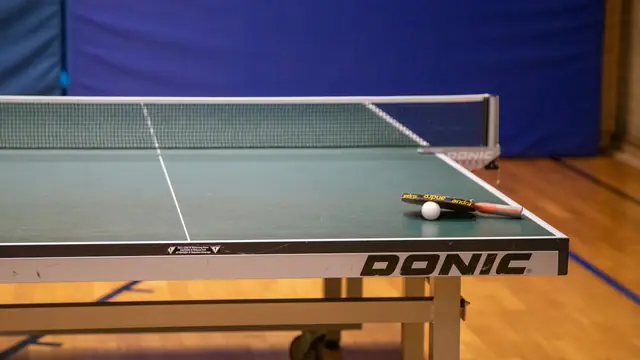
Yes. A DIY ping pong table is two flat, painted boards, each 1.37 m x 1.525 m (4.5 ft x 5 ft), set side by side on a stable base so the playing surface sits 76 cm (30 in) off the floor. Paint the tops a dark matt color, add 2 cm white edge lines, clamp on a net, and you have a full-size 9 x 5 ft table.
The hard parts are getting a board big enough, keeping it flat, and getting a bounce close to a real table. This guide covers all three, plus paint, lines, nets, outdoor builds and decorated party tables.
Quick Facts
- Full table: 2.74 m x 1.525 m (9 ft x 5 ft)
- Each half: 1.37 m x 1.525 m (4.5 ft x 5 ft)
- Playing height: 76 cm (30 in) from the floor to the top surface
- Bounce target: about 23 cm when a standard ball is dropped from 30 cm
- Surface: uniformly dark and matt
- Lines: 2 cm white side and end lines; 3 mm white center line for doubles
- Net: 15.25 cm (6 in) high along its whole length
- Difficulty: moderate; large sheets need two people and a straight cutting guide
What the Rules Say a Table Must Be
The ITTF Laws of Table Tennis are the best blueprint for a table that plays "right". Law 2.1 sets four things a builder can control:
- Size and height: a rectangle 2.74 m long and 1.525 m wide, lying horizontally 76 cm above the floor.
- Material and bounce: any material is allowed, as long as it gives a uniform bounce of about 23 cm when a standard ball is dropped onto it from 30 cm.
- Color: uniformly dark colored and matt.
- Lines: a white line 2 cm wide along each edge, plus a 3 mm white center line for doubles.
Notice what is missing: there is no thickness rule. The bounce test does that job. For the full measurement breakdown in feet, inches and centimeters, see our ping pong table dimensions guide.
Materials and Tools List
This list is for a two-piece indoor table on a simple wooden frame. Using sawhorses or an existing table? Skip the lumber and fasteners.
| Item | What to Get | Notes |
|---|---|---|
| Top panels | 2 panels of 3/4 in (19 mm) or 1 in plywood or MDF | Each panel cut to 4.5 x 5 ft; see sheet-size options below |
| Frame lumber | Straight 2x4s (or 2x3s) for aprons, cross braces and legs | Pick the straightest boards in the stack |
| Fasteners | Wood screws, wood glue, optional leg brackets or bolts | Screw the top from below so no heads show on the surface |
| Primer | Primer suited to your board (oil-based is often advised for MDF) | Seals raw fibers and edges |
| Top coat | Dark flat or matte paint (blue, green or black) | Avoid gloss and semi-gloss |
| Line paint | White flat paint | Small can is enough |
| Tape | Painter's tape and a 2 cm (3/4 in) wide guide | For crisp edge lines |
| Net set | Clamp-on net and posts rated for your board thickness | Check the maximum thickness before buying |
| Tools | Circular or track saw with a straightedge, drill/driver, sander (80 to 220 grit), tape measure, level, square, roller and brush | A random-orbit sander gives the most even surface |
| Safety gear | Respirator or dust mask, safety glasses, hearing protection, gloves | MDF dust is fine and plentiful |
Choosing the Board: Plywood vs MDF
Both work indoors. The right choice depends on where the table will live and how much weight you can handle.
| Board | Strengths | Weaknesses | Best For |
|---|---|---|---|
| MDF | No grain, takes paint well, uniform density | Heavy, swells with water contact, dusty to cut, can contain formaldehyde | Indoor tables that stay put |
| Softwood plywood (fir, pine, spruce) | Lighter, widely sold, resists warping | Face grain and voids need sanding and filling | Budget indoor builds |
| Birch plywood (e.g. Baltic birch) | Smooth face, few voids, sold in 5 x 5 ft sheets | Costs more than softwood ply | Best-feeling wooden DIY top |
| Exterior or marine plywood | Waterproof glue, handles moisture | Still needs full sealing and paint | Outdoor tables |
| Particle board | Cheap | Low strength and poor moisture resistance | Not recommended |
Commercial tables mostly use fiberboard tops, which is why MDF is a natural DIY substitute. Greg's Table Tennis Pages notes that MDF is cheaper than high-density fiberboard but not as durable.
How Thickness Affects Bounce
Thickness is the single biggest factor in how a homemade top plays. A thin board flexes when the ball lands, which soaks up energy and gives a lower, uneven bounce, especially near unsupported edges. A thicker, denser board stays stiff and returns the ball more consistently.
- 1/4 in to 1/2 in: only workable if laid flat on a solid surface such as a dining table. On a frame, expect dead spots.
- 3/4 in (19 mm): the usual DIY choice. Hunker suggests 3/4 in or 1 in plywood, and Greg's Table Tennis Pages says a 3/4 in top should be fine for playability.
- 1 in (25 mm): closest to the 22 to 25 mm tops that STIGA lists for many tournament-grade indoor tables, but heavy to move.
For a deeper look at how commercial tops compare, see ping pong table thickness.
The Sheet Size Problem
Standard sheets are 4 x 8 ft, and a regulation half needs 4.5 x 5 ft. A 4 ft sheet is a foot too narrow. You have three realistic options:
- Use 5 x 5 ft sheets. Baltic and other birch plywood is commonly sold at 1525 x 1525 mm (5 x 5 ft). That width matches the 1.525 m regulation width, so each sheet becomes one half after you trim its length to 1.37 m.
- Join sheets. Glue and screw a strip to a 4 x 8 sheet with a backing cleat underneath. It works, but a seam can create a dead spot or a ridge, so sand it flush and put it where the ball lands least, near the end line.
- Go undersized. Cut a single 4 x 8 sheet in half for two 4 x 4 ft courts. It is not regulation, but it is fine for kids and casual rallies in a small room.
How to Build a DIY Ping Pong Table, Step by Step

- Plan the base and height. Decide whether the top will sit on a frame, sawhorses or an existing table. Work backward from 76 cm (30 in): leg height = 30 in minus the top thickness minus any apron height above the legs.
- Cut the two halves. Mark each panel at 1.37 m x 1.525 m (54 in x 60 in). Clamp a straightedge to the sheet and cut with a circular or track saw, supporting both sides so the offcut does not snap. Check that both diagonals of each half match so the corners are square.
- Build the frames. For each half, make a rectangular apron from 2x4s set slightly inside the panel edges, with at least two cross braces underneath. Bracing every couple of feet keeps a 3/4 in top from sagging and reduces dead spots.
- Attach legs or supports. Fix four legs to each frame with glue and screws or bolts, plus diagonal braces if the table wobbles. With sawhorses, use four adjustable or same-height horses and lay the frames across them. For a dining table, pad the surface and center both halves on top.
- Fix the tops. Glue and screw each panel to its frame from below, so no screw heads reach the playing surface. Set the two halves side by side and check with a long level that they are flat and flush at the center joint. Shim any leg that is short.
- Sand. Fill any voids or dents with wood filler, then sand the faces smooth, working from coarse (around 80 grit) to fine (180 to 220 grit). Ease the edges slightly so paint does not chip. Vacuum and wipe off all dust.
- Prime and seal. Prime the faces and especially the edges; raw MDF edges soak up paint and moisture. Let it dry fully, then sand lightly with fine grit.
- Paint the playing surface. Roll on two or three thin coats of dark flat paint, sanding very lightly between coats. Follow the recoat times on the can. Thin coats dry flatter and more evenly than one thick coat.
- Mark and paint the lines. Tape both sides of a 2 cm white line along every outer edge, and an optional 3 mm center line running lengthwise for doubles. Paint white, then pull the tape while the paint is still slightly soft for a clean edge.
- Cure, then test the bounce. Let the paint cure before play. Drop a ball from 30 cm in several spots, including near the center joint and edges, and look for a bounce close to 23 cm. Add bracing under any spot that bounces low.
- Clamp on the net. Fit the net set at the center joint and set it to 15.25 cm (6 in) high along its whole length.
Supports: Frame, Sawhorses or an Existing Table
| Base | Effort | Stability | Storage |
|---|---|---|---|
| Built wooden frame with legs | Highest | Best, once braced | Bulky unless legs fold or unbolt |
| Sawhorses | Low | Good if the horses are sturdy and matched | Easy; tops lean against a wall |
| Dining or pool table | Lowest | Good on a flat, solid table | Easy; top lifts off |
A top laid on another table is basically a homemade conversion top. If your base table is shorter or smaller than 9 x 5 ft, check how commercial table tennis conversion tops handle overhang and padding before you build.
Painting a Ping Pong Table
Choosing Ping Pong Table Paint
Specialist table tennis paints exist, but most DIY builders use ordinary flat or matte paint. What matters is the finish, not the brand:
- Dark color: blue, green or black give the white or orange ball the most contrast. The Laws require dark, but do not name a color.
- Matt finish: gloss reflects overhead lights and makes the ball hard to track. It also breaks the "matt" rule.
- Hard-wearing: a durable flat enamel or similar finish resists paddle scuffs better than soft wall paint.
Painted and Decorated Tables
Painted tables with flags, team logos or artwork are popular for game rooms and parties. For real ping pong, keep the playing surface plain, dark and matt with white lines; busy graphics make the ball harder to see. Put designs on the edges, the apron, the underside of a flipped top, or a second dedicated party top.
If the table is mainly for beer pong, the build is different. The official World Series of Beer Pong table is 8 ft x 2 ft and about 27.5 in high, so one 4 x 8 sheet ripped down the middle is enough. See beer pong table dimensions for the full layout. Seal any painted design under a clear coat so drinks and balls do not wear it off.
Net Options for a Homemade Table

Building a net from scratch is rarely worth it. A clamp-on net set is the easiest way to get the regulation 15.25 cm height, and it removes in seconds. The key spec is maximum table thickness: some spring-clip sets fit only 1 in tops, while others reach 1.5 in. Measure your finished top, including paint, before ordering. Our best ping pong nets guide compares clamp types in detail.
JOOLA Premium Inside Net and Post Set
Best for: Indoor homemade tables between 3/4 in and 1.5 in thick
A 72 in spring-clamp net set that fits tables up to 1.5 in thick, which covers the usual plywood and MDF thicknesses for a homemade top. Height and tension are both adjustable, so you can set the net to the regulation 6 in.
| Clamp | Spring clamp (clip-on) |
|---|---|
| Max Table Thickness | 1.5 in |
| Net Length | 72 in |
| Tension | Pull-string with hook-on beads |
| Height Adjustment | Adjustable |
Pros
- Clips on and off without tools
- 1.5 in range covers 3/4 in and 1 in DIY tops
- Adjustable height and tension
Cons
- Net material is not published
- Spring clamps hold less firmly than screw clamps over time
For a table that stays outside, a weatherproof set avoids rusting steel posts.
JOOLA Outdoor Weatherproof Net and Post Set
Best for: Homemade tables that live outside
JOOLA's weatherproof set uses hard plastic posts, a weatherized net and a screw mount with a padded locking plate. It is made for tables at least 1/2 in thick, which suits an exterior plywood top.
| Clamp | Screw mechanism with padded locking plate |
|---|---|
| Net Length | 72 in |
| Net | Weatherized |
| Posts | Hard plastic |
| Table Fit | Tops at least 1/2 in thick |
Pros
- Plastic posts will not rust
- One dial sets tension and height
- Padded plate protects a painted edge
Cons
- Plastic posts feel less rigid than metal
- Maximum table thickness not published
Building an Outdoor DIY Ping Pong Table
Moisture is the enemy of a homemade top. MDF swells with water contact, so do not use it outside, even under a porch roof. Instead:
- Use exterior or marine-grade plywood, which is made with waterproof glue.
- Seal every face and edge, including the underside, with exterior primer and exterior flat paint.
- Use exterior-rated screws and pressure-treated or sealed lumber for the frame.
- Keep it covered between sessions with a fitted cover (see best ping pong table covers) or store the halves indoors.
Even well-sealed wood will need repainting over time. If you want a table that lives outside year-round, compare the cost with purpose-built outdoor ping pong tables or a permanent concrete ping pong table.
Time, Difficulty and Cost
Plan on a weekend for cutting, framing and sanding, then several more days for paint to dry and cure between coats. The skills are basic carpentry, but full-size sheets are awkward, and straight cuts need a guide.
On cost, a DIY top on sawhorses is usually the cheapest way to get a full-size playing surface, especially if you already own the tools. A fully framed table with birch plywood, quality paint and a good net set narrows the gap. Greg's Table Tennis Pages argues that a budget branded table will likely outplay a homemade one unless you are a skilled woodworker. Compare real numbers in our ping pong table prices guide before you buy materials.
Safety Tips
- Dust: cut and sand MDF in a ventilated space while wearing a respirator and goggles.
- Lifting: full sheets are heavy and catch the wind; carry them with a helper.
- Cutting: support both sides of every cut so the blade does not bind and kick back.
- Paint fumes: paint with doors open or outdoors, and follow the label.
- Stability: players lean on tables. Brace the legs and check that no half can tip when pushed at the edge.
Once the table is done, pick up a pack of decent table tennis balls, and keep the surface fresh with our ping pong table cleaning tips.
Frequently Asked Questions
What Size Plywood Do I Need for a Ping Pong Table?
Each half of a regulation table is 1.37 m by 1.525 m (4.5 ft by 5 ft). Standard 4 x 8 ft sheets are a foot too narrow, so either use 5 x 5 ft sheets (one per half), join sheets with a seam, or accept a smaller 8 x 4 ft table for casual play.
How Thick Should a Homemade Ping Pong Table Be?
Most DIY builds use 3/4 in (19 mm) or 1 in board. The ITTF sets no thickness, only a bounce of about 23 cm from a 30 cm drop; thin sheets like 1/4 in flex and give a dead, uneven bounce unless they sit on a solid surface.
What Paint Do You Use on a Ping Pong Table?
Use a dark, flat (matt) paint over a primer, such as dark blue, green or black, and white paint for the lines. Gloss finishes break the matt rule and cause glare. Chalkboard paint is a popular shortcut, but some players find it gritty.
Is MDF or Plywood Better for a Ping Pong Table?
MDF has no grain and takes paint well, but it is heavy and swells when wet, so it suits indoor tables only. Plywood is lighter and handles moisture better, and exterior or marine-grade plywood is the choice for an outdoor build.
Is It Cheaper to Build or Buy a Ping Pong Table?
A basic DIY top on sawhorses usually costs less than a new full-size table, especially if you already own tools. Once you add a full frame, premium board, paint and a net set, the savings narrow, and a budget branded table may play better.
Can You Paint a Design on a Ping Pong Table?
Yes, for casual and beer pong use. For real table tennis, keep the playing surface uniformly dark and matt with white lines, and put graphics on the edges, apron or a separate party top so the ball stays easy to see.